7 Creative Ways to Use Blue Hour for Dramatic Landscapes
Capturing the Gradient Sky
Reflections in Still Water
Blending Artificial Light with Natural Twilight
Silhouetting Foreground Elements
Enhancing Textures with Soft Light
The Transition from Golden to Blue
Using Color Contrast for Depth
This post breaks down seven specific techniques to capture more dramatic images during the blue hour, focusing on light balance, color theory, and advanced camera settings. You'll learn how to manipulate artificial light, manage high-contrast scenes, and use the natural indigo hue of the sky to create depth in your landscape photography.
What is the Blue Hour in Photography?
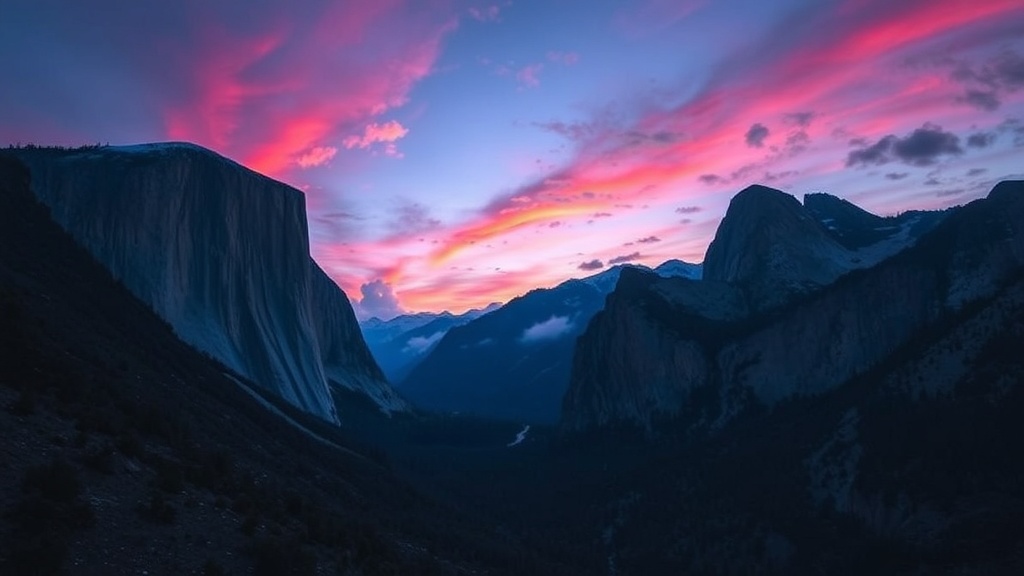
The blue hour is the period of twilight when the sun is far enough below the horizon that the sky takes on a deep blue or indigo hue. It occurs twice a day: once before sunrise and once after sunset. Unlike the golden hour, which relies on warm, direct light, the blue hour provides a soft, ambient light that eliminates harsh shadows and creates a moody, ethereal atmosphere.
For landscape photographers, this window is a high-stakes game. You're fighting against rapidly changing light levels. One minute the sky is a vibrant cobalt, and the next, it's a muddy dark grey. You need to be fast.
How Do You Capture the Perfect Blue Hour Landscape?
Capturing the perfect blue hour landscape requires a tripod, a long exposure, and a steady hand. Because the light levels drop so quickly, you can't rely on handheld shooting. You need to be able to leave your shutter open for several seconds to soak up the remaining ambient light.
First, get your tripod setup ready before the sun even dips below the horizon. If you're waiting for the blue to hit before you start setting up, you've already lost. The transition from golden hour to blue hour happens in a blink.
Use a remote shutter release or a 2-second timer to prevent camera shake. Even the slightest vibration from your finger pressing the button can ruin a 10-second exposure. If you don't have a remote, use the built-in timer on your DSLR or mirrorless camera.
1. Mixing Artificial Light with Natural Twilight
One of the most effective ways to add drama is by combining the cool blue of the sky with warm artificial light sources. Think of a lonely street lamp, a glowing cabin window, or even a car's headlights. This creates a color temperature contrast—blue vs. orange—that the human eye finds incredibly striking.
If you're shooting near a city, look for ways to include light from buildings. The contrast between the cold, natural light of the sky and the warm, man-made light of the architecture creates a sense of depth. It makes the landscape feel lived-in and textured.
2. Using Long Exposures for Water Texture
Blue hour is the perfect time to practice long-exposure water photography. Because the light is low, you can use shutter speeds of 15 to 30 seconds to turn crashing waves into a soft, milky mist. This technique works beautifully for coastlines or even slow-moving rivers.
A strong tripod is non-negotiable here. If the ground is uneven, use a tripod with a heavy center column or even a sandbag to keep it steady. If your camera moves even a millimeter during that 20-second window, your "mist" will just look like a blurry mess.
3. Creating Depth with Light Painting
Don't be afraid to introduce your own light to the scene. If you have a foreground element—like a rock formation or a specific tree—that feels too dark, you can use a handheld light source to subtly illuminate it. This is essentially a more controlled version of using light painting to enhance long exposure landscapes.
The key is subtlety. You aren't trying to light up the whole forest; you're just adding a touch of texture to the foreground. Use a low-lumen flashlight or even your phone's LED. This guides the viewer's eye through the frame, from the dark foreground to the glowing blue background.
4. Capturing Urban Silhouettes
The blue hour is the best time for silhouettes. When the sky is still bright but the ground is dark, you can position yourself to have a skyline or a mountain range as your subject. The goal is to have the light behind the subject, turning it into a dark, sharp shape against a colorful sky.
Underexpose slightly to ensure the silhouette stays black. If you overexpose to try and see detail in the ground, your sky will turn a washed-out white. It's better to have a perfect blue sky and a dark, mysterious foreground than a bright ground and a dead sky.
5. Emphasizing Star Trails and the Transition
As the blue hour fades into true night, you can capture the transition between the two. This is a more advanced technique that involves taking multiple shots as the light changes. You can blend these in post-processing to show the movement of the stars against the fading blue light.
This is a great way to bridge the gap between daytime landscape photography and true night photography. It's a way to show the passage of time in a single frame. If you're interested in the deep night, you might want to look into revealing the galactic core once the blue has fully faded.
6. Playing with Color Temperature (White Balance)
Don't just leave your camera on Auto White Balance (AWB). If you do, the camera will try to "fix" the blue by adding yellow, which kills the very mood you're trying to capture. Manually set your white balance to a higher Kelvin-rating, like 4000K or 4500K, to emphasize the cool tones.
This is where the magic happens. By forcing the camera to lean into the blue, you create a more immersive, cinematic look. It’s a simple setting change, but it makes a massive difference in the final mood of the image.
7. Using ND Filters for Motion Blur
If you're shooting during the early part of the blue hour, you might still have enough light to use a Neutral Density (ND) filter. This allows you to extend your shutter speed even further without blowing out the highlights. This is great for making clouds look like they are streaking across the sky.
A high-quality filter—like those from PolarPro—will ensure you aren't adding weird color casts to your shot. The goal is to keep the blue pure, not muddy.
| Technique | Primary Goal | Best Shutter Speed |
|---|---|---|
| Artificial Light Mix | Color Contrast | 1 - 5 Seconds |
| Water Texture | Smoothing/Mist Effect | 10 - 30 Seconds |
| Silhouettes | Shape and Outline | 2 - 8 Seconds |
| Star Transition | Time-lapse/Motion | 30+ Seconds |
Common Equipment for Blue Hour Photography
You don't need a studio full of gear, but certain tools make this much easier. The most important thing is stability. If you're out in the wind, a standard lightweight tripod might not cut it.
- Sturdy Tripod: Something with a weight hook to add stability.
- Remote Trigger: To avoid any unnecessary vibration.
- Extra Batteries: Long exposures and cold air drain batteries fast.
- Wide-Angle Lens: To capture the scale of the sky and landscape.
- Graduated ND Filter: To help balance the bright sky with the dark ground.
I often find myself checking the weather on sites like NOAA to see cloud cover levels. A clear blue hour is beautiful, but a little bit of cloud cover can actually add a lot of texture and drama to the light. If the sky is too clear, it can feel a bit empty.
One thing to watch out for: the "muddy" phase. This happens when the blue hour ends and the light becomes too low for a good exposure, but too high for star photography. If your images are looking gray and lifeless, you've likely missed the window. Don't be afraid to pack up and try again tomorrow. Timing is everything in this game.