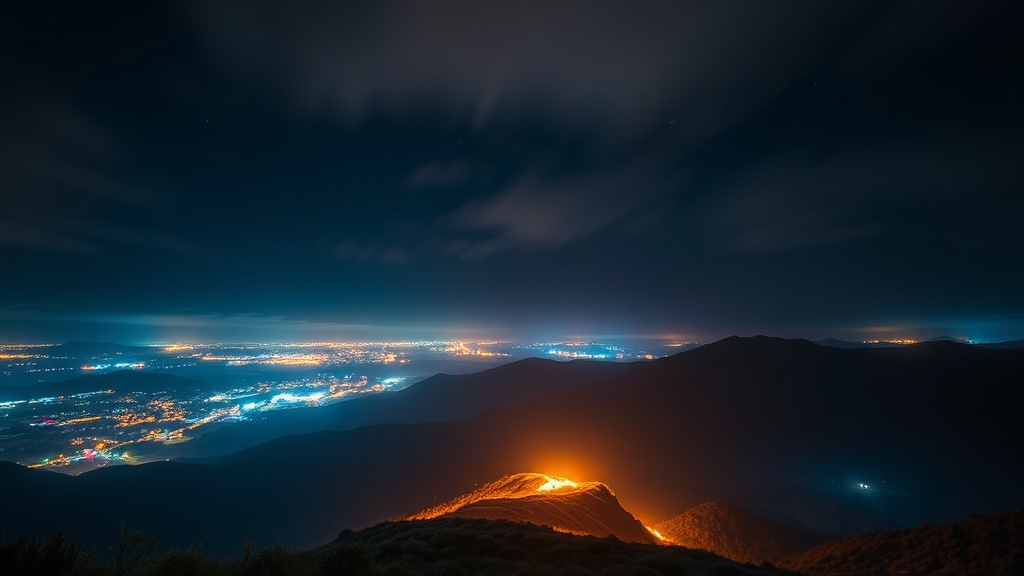
Using Light Painting to Enhance Long Exposure Landscapes
Have you ever looked at a dark, moody landscape and felt like something was just... missing?
Light painting is the technique of using handheld light sources to manually illuminate specific parts of a scene during a long exposure. Instead of relying solely on the ambient light available—which is often too dim or too flat for a striking shot—you become the lighting technician. This post breaks down the gear you need, the technical settings required to avoid blown-out highlights, and the physical movements that turn a flat landscape into a three-dimensional work of art.
Most people think long exposure is just about setting a tripod and hitting the shutter. They're wrong. If you want to actually direct the viewer's eye, you have to get up and move.
What Gear Do I Need for Light Painting?
You need a sturdy tripod, a reliable light source, and a remote shutter release to succeed at light painting.
The most important piece of gear isn't actually the camera; it's the light you carry. If you're just using a standard flashlight, you'll likely end up with harsh, ugly shadows. I prefer using tools that allow for control over the intensity and color of the light.
- LED Panels: Small, battery-powered panels like the Lume Cube are great because they provide a wide, even wash of light.
- Flashlights: A high-lumen flashlight (like a Maglite or a high-end Olight) is better for "spotlighting" specific textures like rock faces or tree bark.
- Color Gels: These are cheap plastic sheets that clip over your light. They can change a white light to a deep amber or a cool blue, adding depth to your scene.
- Remote Triggers: You can't press the shutter button with your finger—the vibration will ruin the shot. Use a wired remote or a wireless trigger.
Don't overcomplicate it at first. Even a smartphone flashlight can work, though it's far from ideal. I've seen people make incredible shots with just a basic camping lantern and a bit of creativity.
How Do I Control Light Intensity During a Long Exposure?
Control the intensity of your light by adjusting your distance from the subject and the duration of your "paint" strokes.
This is where most beginners fail. They walk past the subject too quickly, or they hold the light too close, resulting in a "hot spot" that looks completely artificial. Think of your light as a brush and the landscape as your canvas. If you get too close, you'll blow out the highlights and lose all the texture. (And trust me, once a highlight is clipped in a RAW file, you aren't getting that detail back.)
Here is a quick reference for how different light movements affect your final image:
| Movement Type | Visual Result | Best Use Case |
|---|---|---|
| Slow Sweep | Soft, even illumination | Large rock walls or wide ground areas |
| Quick Flick | Sharp, bright accents | Highlighting a single branch or edge |
| Circular Motion | Creates a "glow" effect | Adding a sense of energy around a subject |
| Static Hold | High intensity in one spot | Creating a focal point (the "hero" light) |
If you're working in an urban environment, you might find yourself balancing neon and shadow. The same rules apply: use your handheld light to fill in the shadows that the neon lights can't reach.
What Are the Best Camera Settings for Light Painting?
Start with a low ISO, a narrow aperture, and a long shutter speed to create a clean, noise-free image.
You aren't just taking a photo; you're building an image over time. Your camera settings need to provide a blank, dark canvas for your light to paint on. If your base exposure is too bright, your light painting will look washed out and cheap.
- ISO: 100 or 200. Keep it low. You want the cleanest possible files for post-processing. High ISO in a long exposure will introduce digital noise that makes your light painting look "crunchy."
- Aperture: f/8 to f/11. You want enough depth of field to keep the landscape sharp, but you don't want to go too far into f/22, or you'll deal with diffraction.
- Shutter Speed: 30 seconds to 3 minutes. This depends on how much "painting" you have to do. If you have a massive cliff to illuminate, you'll need more time.
- White Balance: Daylight or Tungsten. Don't use Auto White Balance. It'll shift mid-shot as you move your light around, which is a nightmare to fix later.
A quick tip: Always use a tripod. A heavy one. Even the slightest breeze or a heavy footstep can move the camera enough to ruin a 2-minute exposure. If you're using a heavy DSLR, make sure your tripod legs are locked tight. You can check the Wikipedia entry on tripods to understand the physics of stability, but in the field, just make sure it's heavy and planted.
The most important thing to remember is that you are the light source. You have total control. If the scene is too dark, stay out there longer. If a certain area is too bright, back away. It's a physical process, not just a digital one.
One thing I've learned the hard way: watch your feet. It's easy to get so caught up in where you're pointing the light that you trip over a rock or a root. I've definitely had a few bruised ankles during a particularly ambitious session in the Boise foothills.
If you're using a specialized light, like a high-powered Pelican case light or a professional strobe, be mindful of the "flare" it can create in your lens. If you're too close to the glass, you'll get a massive white blob in the middle of your beautiful landscape. Keep the light source slightly off-axis to prevent this.
The beauty of this technique is that it allows you to create something that doesn't actually exist in the way you see it. You are essentially "drawing" with light. It takes practice—lots of it—but once you get the hang of the rhythm, the results are incredible.
Steps
- 1
Set up your tripod and timer
- 2
Select a controlled light source
- 3
Execute controlled light sweeps
- 4
Review and adjust exposure levels