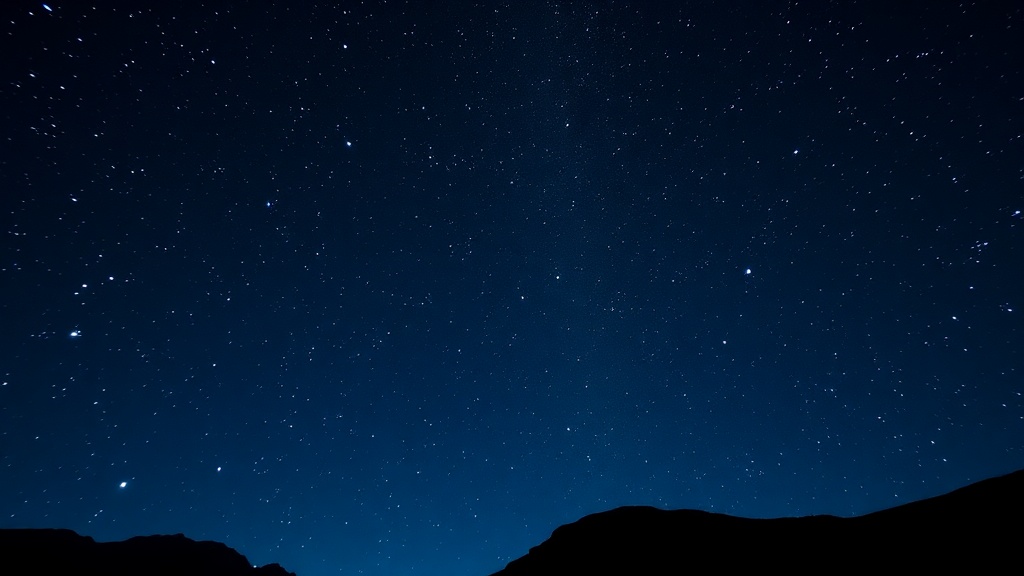
Why Sharp Stars Aren't Everything in Night Sky Photography
Most photographers obsess over tack-sharp star points—and completely miss the atmospheric character that makes night sky images memorable. Yes, pinpoint stars have their place. But the pursuit of technical perfection often strips away the mood, mystery, and raw feeling that drew you to night photography in the first place. This post explores when to embrace blur, haze, and imperfection to create night sky photographs that actually resonate with viewers.
When Should You Intentionally Blur the Stars?
The 500 Rule (divide 500 by your focal length to get maximum shutter speed before star trails appear) has become gospel. Follow it religiously, and you'll get sharp stars every time. But here's the thing—not every night sky scene benefits from frozen pinpricks of light.
Consider the emotional weight of slight motion in your stars. A 30-second exposure at 24mm keeps stars acceptably sharp. Stretch that to 90 seconds, and those same stars elongate into soft dashes—still recognizable as stars, but now carrying a sense of time passing. The sky feels alive, rotating, indifferent to your camera's presence. This technique works beautifully when you have a strong terrestrial anchor: a silhouetted mountain ridge, an abandoned structure, a lone tree. The sharp foreground against the softly drifting sky creates visual tension that pin-sharp stars simply cannot match.
There's also the practical reality of dark locations. If you're shooting at f/4 with a crop-sensor camera at ISO 3200, you need significant exposure time just to register the Milky Way. Rather than pushing your ISO into noisy territory or opening up to a soft f/2.8 lens, accept some trailing. The noise you'll avoid and the extra depth of field you'll gain often outweigh the "flaw" of slightly elongated stars. Night Photography Workshop has excellent examples of how different exposure lengths affect the emotional impact of astrophotography.
Can Light Pollution Actually Improve Your Images?
Every night photography tutorial warns about light pollution. Drive hours away from civilization, they say. Find Bortle Class 1 skies. And yes, for revealing the full structure of the Milky Way with minimal noise, dark skies are unbeatable.
But light pollution—used intentionally—becomes a creative tool rather than an enemy. The warm sodium glow from distant towns can paint your foreground with color that's impossible to replicate in truly dark locations. That orange band on the horizon? It can serve as a gradient backdrop for your composition, adding depth and context. You're not just photographing stars; you're photographing the relationship between human presence and the cosmos.
The technique requires restraint. You need enough pollution to add color and foreground illumination, but not so much that it overwhelms the sky. Locations on the edge of darkness—Bortle Class 4 or 5 areas—often provide the best balance. The key is shooting during the astronomical dark window (when the moon is down) so the artificial light doesn't completely dominate. Light Pollution Map helps identify these transitional zones where city glow meets starlight.
Post-processing becomes critical here. You'll need to separate the warm color cast in your foreground from the cooler tones of the night sky. Gradient filters and selective color adjustments in Lightroom or Photoshop let you preserve the atmospheric character while preventing everything from turning orange. The result feels authentic—because it is. You're showing the sky as it exists in most populated areas, not some pristine wilderness that most viewers will never visit.
What Role Does Weather Play in Creative Night Photography?
Clear skies dominate night photography discussions for obvious reasons. But overcast nights, partially cloudy conditions, and even fog create opportunities that clear-sky shooters never encounter.
Thin, high clouds diffusing moonlight turn the entire sky into a softbox. The stars fade, but the landscape transforms. Shadows disappear. Textures emerge that harsh moonlight would obliterate. This "flat" light (often criticized in daytime photography) becomes magical at night—it wraps around objects, reveals subtle details, and creates an ethereal, dreamlike quality.
Fog and low clouds add another dimension. They catch and scatter artificial light, creating glowing layers that separate foreground from background. A streetlamp becomes a radiant source illuminating misty valleys. Headlights on a distant road trace lines through the haze. The stars might be completely obscured, but you've gained atmosphere—literal and figurative.
These conditions demand different techniques. Autofocus struggles in fog and low contrast, so manual focus becomes mandatory. Your exposure times lengthen significantly as available light drops. And your white balance needs careful attention, as mixed light sources (moonlight, artificial glow, scattered reflections) create complex color situations that auto modes mishandle. But the results justify the effort: images that feel more like paintings than photographs, scenes that suggest rather than document.
Is There Value in Leaving Noise Unreduced?
Modern cameras handle high ISO remarkably well. Software noise reduction has become sophisticated. The expectation—unspoken but pervasive—is that clean, grain-free night sky images represent "good" photography.
Yet noise carries information. Those speckles of luminance and color variation aren't just errors; they're the signal your sensor struggled to capture. Aggressive noise reduction smoothes away that signal along with the grain. Stars become soft. The subtle texture of airglow disappears. Your image turns plastic.
Selective noise reduction offers a middle path. Apply heavy reduction to uniform areas like sky gradients, but preserve or lightly reduce noise in detailed regions. Better yet, embrace the grain entirely. Film photographers working with pushed Kodak P3200 or Ilford Delta 3200 accepted grain as part of the medium's character. Digital noise can serve the same function—it adds grit, suggests the difficulty of the capture, prevents the image from feeling too polished or artificial.
The documentary tradition in photography has always valued authenticity over perfection. Night photography, with its technical challenges and atmospheric conditions, aligns naturally with this approach. Your viewer shouldn't forget that this image required patience, tolerance of discomfort, and acceptance of imperfect conditions. Visible noise reminds them.
How Do You Find Your Own Night Photography Voice?
Technique serves vision, not the reverse. The rules exist to provide a starting point, not a destination. Sharp stars, dark skies, clean images—these are technical achievements, not artistic ones.
Your voice emerges when you stop asking "Did I do this correctly?" and start asking "Does this image feel like what I experienced?" Sometimes that means accepting star trails in a shot you intended to freeze. Sometimes it means shooting through light pollution instead of fleeing from it. Sometimes it means leaving the grain, the haze, the imperfections that make the moment real.
The photographers who defined night photography as a genre—people like Gregory Crewdson with his cinematic constructed scenes, or the pioneers of film astrophotography working with limited technology—succeeded because they pursued a vision, not a specification. Their images resonate because they communicate something beyond technical competence.
Your next night shoot, experiment with breaking the rules. Intentionally overexpose and recover shadows to see what hidden detail emerges. Shoot through thin clouds and watch how they scatter starlight into halos. Leave your tripod behind and hand-hold a high-ISO shot, accepting the motion blur as an artistic choice rather than a failure. The worst outcome is a deleted file. The best outcome is discovering an approach that feels authentically yours.
Night photography rewards those who stay out longer, push boundaries further, and accept that the universe doesn't arrange itself for convenient capture. The stars will keep moving whether your shutter is open or closed. The question is whether you'll create something that reflects your unique relationship with the night—or just another technically competent image that follows all the rules.