Start at Blue Hour, Not Pitch Black: A Better City Night Photography Workflow
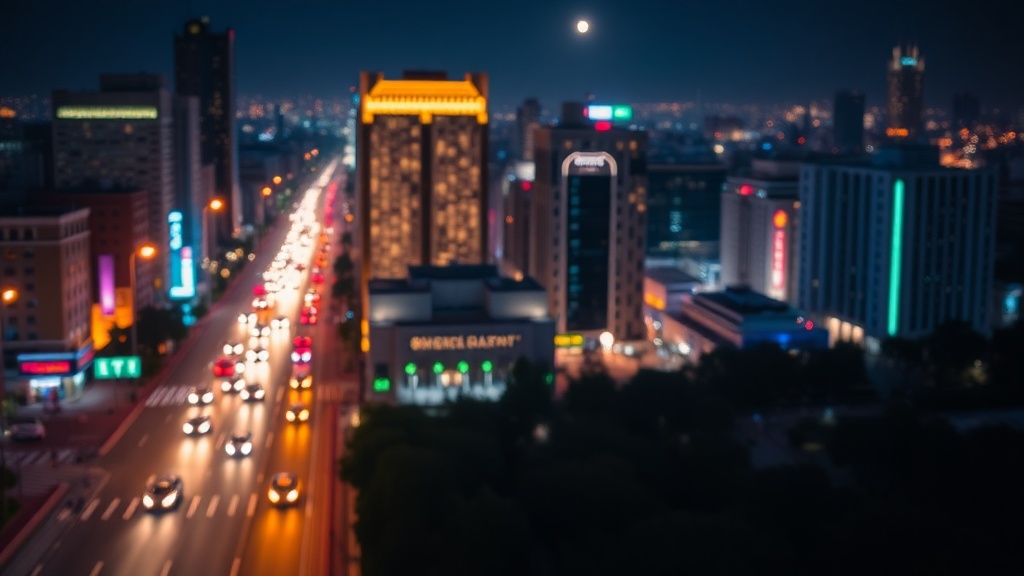
A lot of photographers think night photography starts when the sky turns fully black. For city work, that's usually the moment your options get narrower, not better. This article shows how to begin during blue hour, shift your settings as the light falls, and keep neon, streetlights, and storefronts from turning into harsh white blobs. If your night files feel muddy, noisy, or flat, the fix usually starts with timing.
When should you start a night photography session?
For most urban scenes, arrive 20 to 30 minutes before sunset and start serious frames about 10 to 20 minutes after sunset. That window lets the sky hold color while the city lights wake up. Buildings still separate from the background, reflections look richer, and shadows don't collapse into one dead mass. You're not waiting for darkness; you're photographing the handoff.
Don't guess the timing from your phone wallpaper and hope for the best. Check the official sunset and civil twilight times with NOAA's Solar Calculator. Civil twilight matters because it's often the sweet spot for city skylines, bridges, and streets with mixed lighting. If you're scouting a new block, be on location before the first good frame is available so you're not composing under pressure.
What to do before the light drops
- Build the composition while you can still see edges, foreground clutter, and poles that will become annoying later.
- Level the tripod and turn off image stabilization once the camera is locked down.
- Pick a fixed white balance, usually around 3400K to 4200K, so the color doesn't swing from frame to frame.
- Take a few test shots before the city lights peak so the exposure changes feel predictable instead of rushed.
Why do blue hour frames often look cleaner than full-dark shots?
Blue hour isn't magic; it just gives your sensor a more forgiving tonal spread. The sky is bright enough to hold detail, the ground isn't buried yet, and you can stay near base ISO. Once the sky goes black, bright points dominate the frame. That pushes you toward longer exposures, higher ISO, or both, which means more noise, clipped highlights, and less flexible files.
If you've wondered why a scene looked dramatic in person but ugly on the card, that's often the reason. Your eyes adapt locally. The camera doesn't. It records the big brightness gaps with zero sympathy.
| Stage | Shutter | Aperture | ISO | Watch for |
|---|---|---|---|---|
| Blue hour | 1 to 4 sec | f/5.6 to f/8 | 100 to 200 | Sky color, window glow, reflections |
| Transition to dark | 4 to 10 sec | f/5.6 to f/8 | 100 to 400 | Neon clipping, car trails, moving people |
| Full dark | 10 to 30 sec | f/4 to f/8 | 200 to 800 | Empty black sky, smeared color, wind shake |
Those aren't hard rules, but they show the pattern: as the sky loses tone, technical compromises grow fast. That's why starting early feels easier in the field and gives you much more room later when you're editing.
What camera settings should you change as daylight disappears?
Start in manual exposure. Aperture-priority can work, but mixed lighting and bright signage make it easy for the camera to lurch around from frame to frame. For most city scenes, start around f/5.6 or f/8. That's sharp enough for buildings and often gives pleasant starbursts on streetlights without turning every exposure into a minute-long wait.
Change one variable at a time. First lengthen the shutter. Then open the aperture if you need to. Raise ISO last. That order keeps the file cleaner and helps you see what each adjustment actually did. Watch the histogram, but also turn on highlight warnings. Night shooters get in trouble by chasing bright midtones and forgetting that blown signs never come back.
A simple transition sequence
- Lock composition and focus before the light gets scarce. Use magnified live view on a bright edge or a lit window frame.
- Make a baseline frame at ISO 100, your chosen aperture, and whatever shutter gives a balanced sky.
- Every few minutes, lengthen shutter to keep the sky from dropping too fast.
- If traffic or people introduce blur you don't want, open the aperture one stop before touching ISO.
- When highlight blinkies spread across lamps, signs, and windows, bracket two or three frames instead of forcing one exposure to do everything.
That last step matters more than people admit. Night scenes with LED billboards, bright cafes, and dark side streets can exceed what a single frame handles gracefully. A short bracket is faster than fighting the RAW file later, and it gives you options if one exposure keeps the sign detail while another holds the pavement and building fronts.
How do you keep streetlights and signs from blowing out?
Expose for the brightest important thing, not for the deepest shadow. If the lamps are the mood, keep shape inside the glow. If the sign text matters, protect the letters. Let some dark areas stay dark. Night photos fall apart when every corner is lifted until it looks like bad HDR from 2012.
This is also where composition helps more than settings. Shift a few feet to keep a lamp off the edge of a building. Wait for a bus to leave the frame so reflected color doesn't overwhelm the sidewalk. Use awnings, trees, or bridge railings to hide the ugliest hot spots. Exposure isn't the only control you have.
A clean night frame usually looks slightly darker on the back screen than you want. That's normal. It's much easier to open shadows later than rebuild a blown neon sign.
If you're shooting somewhere unpredictable, make one normal frame, one at -2/3 stop, and one at -1 1/3 stops. That's often enough. You don't need a huge bracket stack unless the scene is extreme, and you definitely don't need to keep brightening the preview until everything looks equally lit.
Which planning tools actually help before you leave home?
Three checks save more bad outings than fancy gear. First, confirm sunset and twilight. Second, check cloud cover and wind with the National Weather Service. Thin cloud can be great in a city because it spreads light and adds texture; low, heavy cloud can turn the sky into a dull ceiling. Third, see what the moon is doing on NASA's Moon Phases page. A bright moon matters less downtown than it does in open country, but it still changes the color and brightness of the sky.
Maps matter too. Street View can tell you whether a promising corner actually has a safe tripod position, a clean sightline, or a giant construction fence that ruins the angle. If you're working a bridge, look up which side keeps the brightest signs behind you. Reflected glare on the front element can wreck an otherwise solid frame.
I also like to plan one primary shot and one fallback within a two-block radius. Night sessions are short. If your first scene is blocked by parked trucks or a festival barrier, you need a fast pivot, not fifteen minutes of indecision. That one habit saves more shoots than buying another accessory.
A repeatable 45-minute city workflow
Here's a practical loop that works in most downtown areas, waterfront streets, and older main-road districts with mixed lighting.
- Arrive 25 minutes before sunset and walk the scene without the camera on the tripod.
- Choose the frame with the clearest shape, strongest light rhythm, and least distracting clutter.
- Set focus manually, lock white balance, and make a few dry-run exposures while the sky still has detail.
- Shoot steadily through civil twilight instead of waiting for one perfect minute.
- Recompose once the sky turns deeper blue and traffic patterns settle into something cleaner.
- Leave when the sky goes flat black and the scene stops gaining anything new.
That last point sounds boring, but it's where discipline pays off. Many photographers stay too long because darkness feels more dramatic. Often the best frame was made twenty minutes earlier, when the sky still separated rooftops, window light still felt warm, and the pavement held color. Past that point you're mostly collecting noisier versions of the same idea.
Next time, pick one corner with strong practical lights, commit to it from blue hour into early night, and watch how the file changes every few minutes. You'll start seeing the moment when the scene has both structure and glow. That's the sweet spot most people walk past while waiting for it to get darker.